lab-aws-cloud-ngfw 


AWS CloudNGFW QwikLab Guide
Overview
The goal of this workshop is to take you through the experience of deploying the Palo Alto Networks CloudNGFW service on AWS to protect your Cloud Native Applications. This workshop will take you through the three step process of using the service - Subscribe, Deploy and Secure.
As part of the workshop you will learn to deploy the service on a centralized model and experience first hand how the service can protect your applications from attacks like the recent Log4J attack, out of the box.

Environment Overview

Figure: Hands on Lab Environment – Cloud NGFW
For this workshop we have automated the deployment of the lab environment including the three VPC - Attack VPC, Vulnerable VPC and Security VPC, along with Transit Gateway and the attack and Vulnerable applications. This is achieved via Terraform, that you will be launching as part of the lab.
What You'll Do
- Deploy the AWS resources required for the lab using Terraform
- Follow the Subscribe-Deploy-Secure workflow to use Cloud NGFW Service to secure AWS applications
- Use the default best practice policy on CloudNGFW to to protect your application against Log4j attack
- Gain end to end visibility on your application traffic with Cloudwatch
Activity 0: Lab Setup
What you'll need
To complete this lab, you'll need:
- Access to a standard internet browser (Chrome browser recommended).
- Time. Note the lab's Completion time in Qwiklabs, which is an estimate of the time it should take to complete all steps. Plan your schedule so you have time to complete the lab. Once you start the lab, you will not be able to pause and return later (you begin at step 1 every time you start a lab).
- You do NOT need an Amazon Web Services account or project. An account, project and associated resources are provided to you as part of this lab.
- If your lab prompts you to log into the console, use only the student account provided to you by the lab.
- You would need to use your email ID to create the tenant. Make sure that you are using the same email address that you used to register with qwiklab. Ensure that you have access to the email address as the password reset email will be sent to that email address.
In this activity, we will launch the lab environment. These are the steps that we will accomplish at this time.
- Start the lab on your designated Qwiklab account.
- Login to the AWS Console using the provided credentials and set up IAM roles
- Deploy lab environment using Terraform
- Launch the Log4J attack on the unsecured environment.
Start the lab
- Once you login to paloaltonetworks.qwiklabs.com, the Home page should display the Labs that you have access to. Identify and click on the Lab that says "Cloud NGFW".

- On the page that opens up, click on AWS CloudNGFW.

- On the Qwiklab environment, Click on Start Lab Button to start the lab.

At this point, Qwiklabs will build an AWS account for you. In order to access the EC2 application instances via SSH in your environment, you will be using keys generated by Qwiklabs. There are two types of keys generated; PEM and PPK keys.
- If you are on a Mac system, you will be using ‘Terminal’ to connect to the devices via SSH. For this, click on the “Download PEM” link. This will download a file named “qwikLABS-L*****-*****.pem”.
- If you are using a Windows laptop to access this lab, you will need to have a SSH application like PuTTY installed. In this case, click on the “Download PPK” link. This will download a file named “qwikLABS-L*****-*****.ppk”.
- Make sure to note the location where the file is downloaded. On a Mac, by default, it should be downloaded to “/Users/<username>/Downloads”.
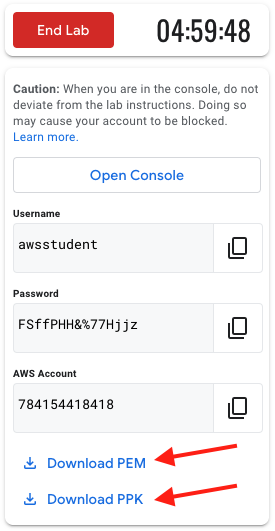
- To login to the AWS environment, right click on “Open Console’ and “Open link in Incognito window” for Chrome-based browsers. For other browsers, use the appropriate option to open the AWS Console in a new private tab.

- On the AWS Console, copy over the IAM username and password from the previous tab.


- Now, click on “Sign In”.

Once you are successfully logged in, you will land on the AWS Management Console.
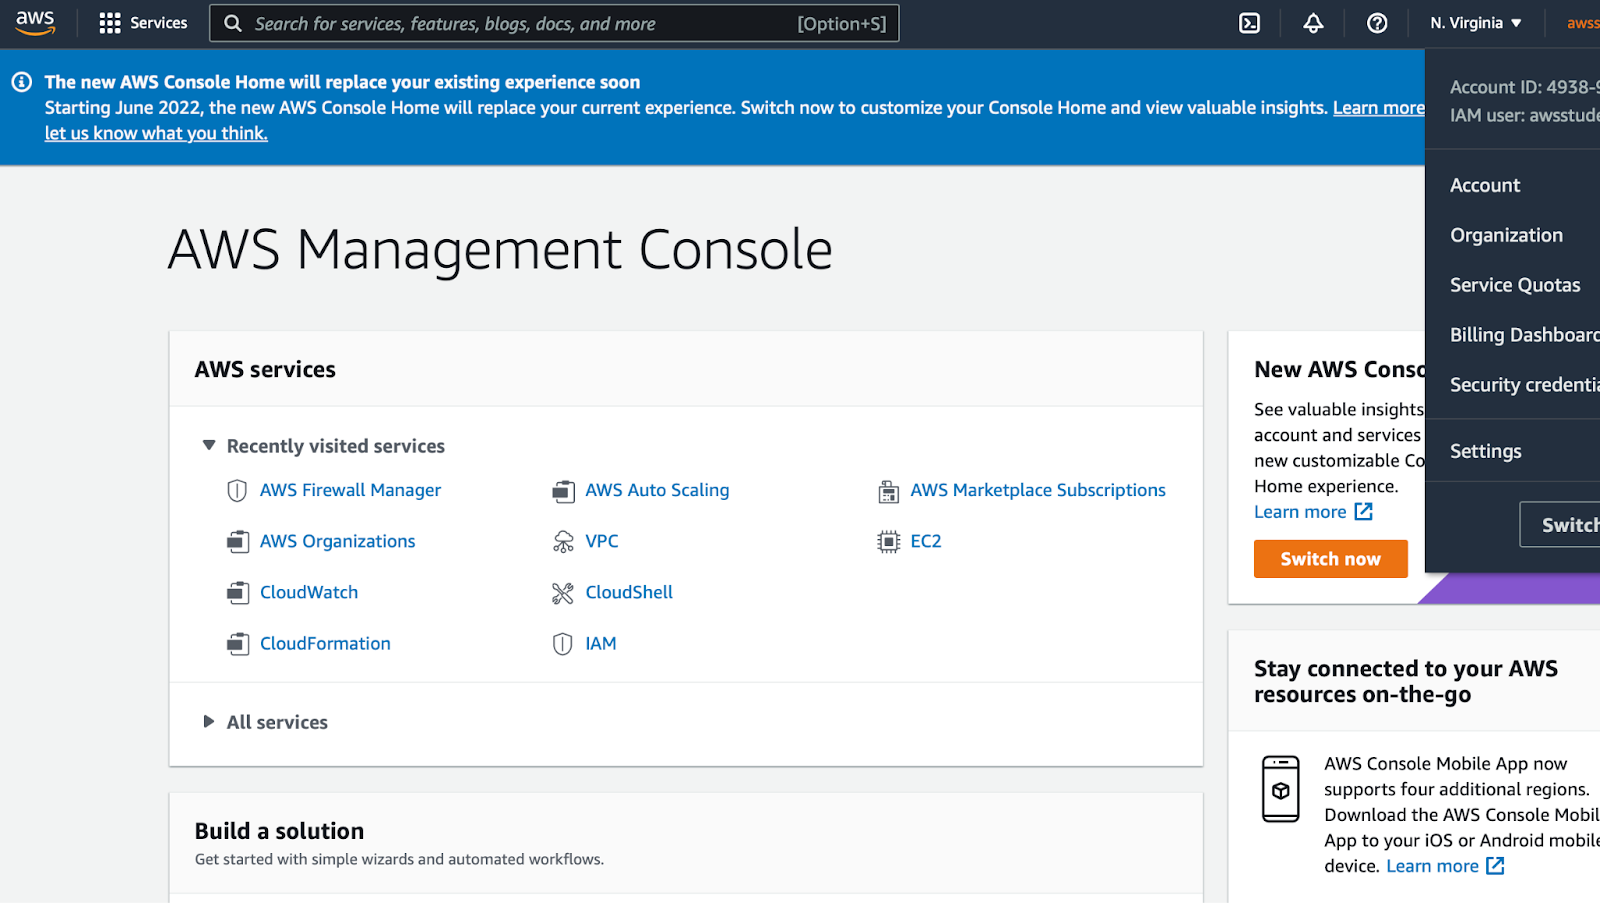
Figure: The AWS Management Console
Set up AWS Account permissions
As mentioned earlier, the Qwiklab user account, by default, does not have the permissions to AWS Marketplace and CloudShell services, which are required for the purpose of this lab. We will now edit the permissions for the Qwiklab user account to provide access to those services.
- On the AWS console, If you see a message for ‘new AWS console’, click on ‘switch now’
- On the search bar type ‘iam’.
- Click on the link to IAM. A new IAM dashboard window will open.

- Click on ‘2’ below users.

- Click on ‘awsstudent’

- Expand the default policy by clicking on the small triangle icon against default_policy in the list.

- Click on the ‘Edit Policy’ button.

- Click on ‘JSON’ tab

- Scroll down to the Deny policy and remove two lines (line number 27 and line number 36) listed below. Now, if we delete line number 27 first, all succeeding lines will move up one line, including line number 36 which has now become 35. To avoid confusion, delete line number 36 first.
"aws-marketplace:\*ubscribe",
...
"cloudshell:\*",
Make sure to delete the whole line.

- Click on ‘Review policy’ at the bottom of the screen

- On the next screen, click on ‘Save changes’

- Account setup is now complete.
Launch lab environment
In this section, we will deploy the AWS Cloud resources required for the purpose of this lab using Terraform.
- Click on ‘AWS’ on the top left hand corner to navigate to the primary console.
- Make sure that the region is N.Virginia.

- Launch Cloud shell using the icon on the top right side of the console

- Close out the welcome pop up.

It takes around a minute for cloudshell to launch and to get the prompt as shown in the example below.
- After the cloudshell is launched, we will first ensure that the home directory is empty by running the below command.
rm -rf *
- After the cloudshell is launched we will start by cloning the following github repository.
git clone https://github.com/PaloAltoNetworks/lab-aws-cloud-ngfw.git

Figure: Example of cloning the GitHub repository
- Change current directory to git repositories’ root directory
cd lab-aws-cloud-ngfw

Figure: Changing the current directory to the repository’s root directory.
- Run the setup script.
./setup.sh
It will take a few minutes (~5 mins) to deploy all the lab components. Status will be updated on the cloudshell console as deployment progresses.
At the end of deployment, you should see the message “Apply complete!”.

Figure: Completion message of the Lab Setup script
Please note the public IP addresses of the Attack App Server and the Vulnerable App Server. You will need to login to these servers later in the lab.

Figure: The Lab topology that is deployed using Terraform
Check the Connectivity between servers
- On the AWS Console, in the Search bar at the top of the page, type “EC2” and from the search results, click on EC2 to open the EC2 console.
- From the left menu, click on Instances and identify the instance with the name “qwikLABS-vul-app-server”. This is the Application server which will be the victim of the attack.
- Note the Public IP Address of the “qwikLABS-vul-app-server” instance.
- Also, identify and note the Public IP Address of the “qwikLABS-att-app-server” instance.

- On your terminal, identify the PEM or PPK file that you downloaded from the Qwiklabs console and update the permissions on the file to make it read-only. Check the example given below.
chmod 400 qwikLABS-xxxx-xxxx.pem
- Login to both the vul-app and the att-app servers using the downloaded PEM or PPK file. Check the example below.
ssh -i <qwikLABS-xxxx-xxxx.pem> ec2-user@<public-ip-vul-app-server>
IMPORTANT: Note that the login username to be used is “ec2-user”.

- If you are using PuTTY to connect to the servers, after opening the putty,
- On the Category menu on the left, expand SSH and click on Auth.
- In the field to select the Private key file for authentication, browse for the downloaded PPK file and select it.
- Make sure that the file permissions on the PPK file is set to Read-Only.

- Within the same PuTTY window, on the Category menu on the left, click on Session and provide the Public IP Address of the vul-app server as shown below.
- Click “Open” to connect to the server.

- Repeat the above steps to connect to the att-app server on a separate PuTTY session.
Setup the Vulnerable App Server
- On the vul-app-server command prompt, execute the command below. You should see the response output as shown in the figure below.
sudo docker container list -a

- If you do not see “vul-app-1” container up or the command errors out, look at the troubleshooting session for instructions for manual start.
- If all is good, run the below command to update the “/etc/hosts” file to add an entry for the attack server.
sudo docker exec vul-app-1 /bin/sh -c 'echo "10.2.1.100 att-svr" >> /etc/hosts'
- To verify the update of the hosts file, try to ping the att-app-server using the hostname provided. Press Ctrl+C to abort the ping.
sudo docker exec vul-app-1 /bin/sh -c 'ping att-svr'

Launch the Log4J Attack
- On the att-app-server command prompt, execute this command to launch the Log4J attack.
/tmp/launch_attack.sh
- You will get a “Hello, world!” message as a response indicating that the attack is successful.

- Switch context to the vul-app-server SSH session and use the following commands to connect to the vul-app-1 container and view the
/tmpdirectory. You will see that the vul-app server has been infected with malware.
sudo docker exec -it vul-app-1 /bin/sh
ls -alrt /tmp

- Let’s delete the malware-sample file for now, for our attack attempt post the configurations of CloudNGFW.
rm -f /tmp/malware-sample
Activity 2: Subscribe
In this section we will first get the AWS lab environment ready.
Overview
- Subscribe to the Cloud NGFW service in the AWS Marketplace.
- Create a Tenant Administrator – A Tenant Administrator is required to be able to add AWS Accounts and Users for accessing the Cloud NGFW service.
- Login/Change Password – Initial Tenant Administrator account setup.
- Add AWS account – Once the Tenant Administrator has been registered and logged in, the AWS account to be monitored must be added to the service.
Subscribe to CloudNGFW
We will now subscribe to Palo Alto Networks CloudNGFW service. Please follow the instructions listed below.
- Use the AWS link to navigate back to Console

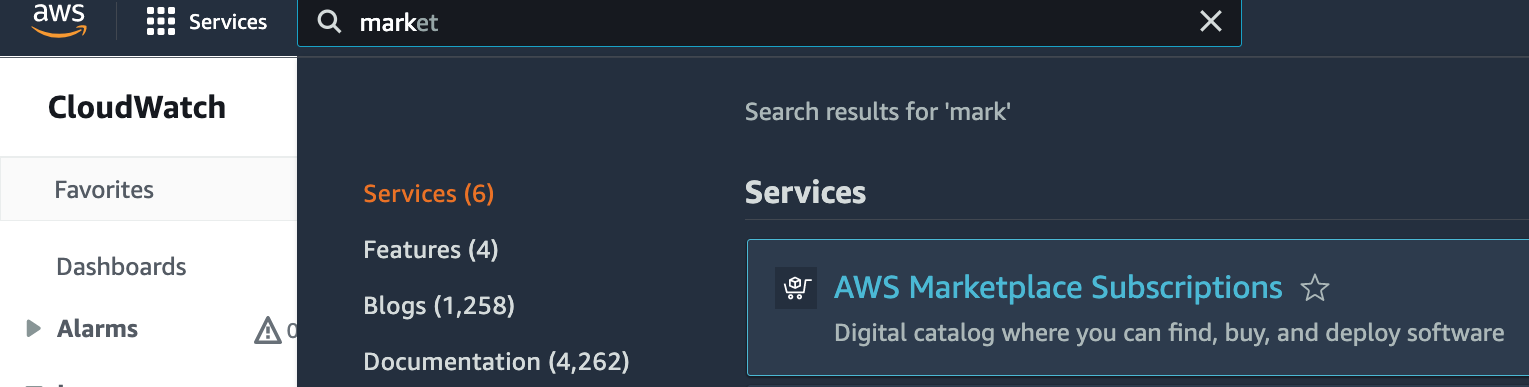
- Search for “marketplace” on the search window and click on ‘AWS Marketplace Subscriptions’

- By default, you will land on the Manage Subscriptions page. Take a look at any existing subscriptions to see if the account is already subscribed to Palo Alto Networks CloudNGFW service.
- If you dont see any existing subscription for AWS CloudNGFW, you can skip the next 3 steps.
- If you find that the account is already subscribed to Cloud NGFW, we would need to cancel the existing subscription before proceeding further. Click on Manage in the CloudNGFW box.

- On the page that opens, find the section that says “Agreement 1” and click on the “Actions” in the same section.

- From the list, select “Cancel Subscription” and on the popup that opens, Check the checkbox and Click on “Yes, cancel subscription”.

- Now, click on Discover Products on the left hand menu.

- Search for
cloudngfwand from the search results that appear, click on the “Cloud NGFW Pay-As-You-Go” link.

- Click on the
Continue to Subscribebutton to start your subscription of Palo Alto CloudNGFW Service.

- You can review the pricing details and click on
Subscribeand then, on the popup that shows, click onSet up software.


Note: Since you are not using your own account for the subscription, you will not be charged for using the Cloud NGFW Service.
- This will open up a new page on the AWS Console where you can register for using the AWS CloudNGW service and also set up your account for usage.

Create a Tenant
- Click on the
Login or create vendor accountto create a Tenant .

- Provide an email address, first and last name.

Note: Make sure that you use the SAME email address that you used to register with qwiklab.
- Once you click on Create, an email will be sent to your email address with temporary credentials. Sign in to you email account and check for email from noreply-cloudngfw-aws@paloaltonetworks.com
- Copy the temporary password provided in the email.

Figure: Email received on registering with the AWS Cloud NGFW service
- Go back to the AWS Console. You will be prompted to change your password. After you have set a new password click on ‘Create’.

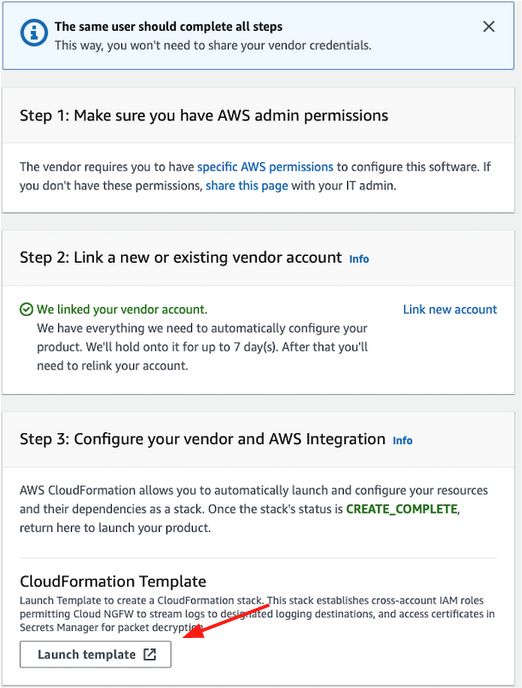
- Link new account status will be changed to “We linked your vendor account”.

- Next click on
Launch Templateto configure the integration between your vendor and AWS. This will launch the AWS CFT console.
- The “Stack name” field will be pre-populated with the value “PaloAltoNetworksCrossAccountRoleSetup”. This must be changed to something unique to avoid any conflicts. In the case of a conflict, you will see an error saying that the “Stack already exists”.


- For all other fields on the form, we will keep all default values. Scroll to the end of the Form.
Note the Cloudwatch log folder name ‘PaloAltoCloudNGFW’. We will be using this later.
- Select the check box to acknowledge.
- Click on ‘Create Stack’

- Monitor the CFT deployment to ensure that it is successful. You might need to refresh for the latest status.

-
Now you have successfully subscribed to CloudNGFW service, created a tenant and associated your AWS account.
-
Click on “Launch Product” to log in to the Cloud NGFW console.

- This time use your new password to login. For the support account, provide organization name and address. (Fill the mandatory fields)

- Click the ‘Close’ button to finish creating the tenant.

Activity 2: Deploy
In this section you will be deploying CloudNGFW service on your application environment to protect your application. You will
- Create a RuleStack
- Create a Firewall Rule
- Create a Cloudwatch Log Group
- Deploy NGFW and Endpoints
Create Rule Stack
- Navigate to the CloudNGFW console. If you are not already logged in, open the link below on the browser tab and enter the credentials that you used to register earlier.
https://web.aws.cloudngfw.paloaltonetworks.com/
- Check that account addition has been successful.

- Navigate to ‘Rulestacks’

- On the right top corner click on ‘Create Rulestack’ and ‘Local’

- In the Create Local Rulestack form,
- Name the rule stack ‘Rulestack1’
- Choose the AWS account from the dropdown.
- Click ‘Save’
Create a Firewall Rule
- Navigate to Rulestack and click on ‘Rulestack1’

- On the Rulestack page, click on the ‘Rules’ tab and click ln ‘CREATE”

- We will now create a rule that allows all traffic, but applies security best practices through Security Profiles. In the General section of the Create Rule Form,
- Name the rule ‘MyFirstCloudNGFWRule’
- Set the Rule Priority to 1
- In the Source and Destination section of the Create Rule Form, leave Source and Destination values as ‘any’

- Scroll down to the Granular Controls section. Set the “Protocols and Ports” value to ‘Any’.
- In the Action section, set the value to “Allow” and click the checkbox to enable Logging.
- Click ‘Save’.

- Navigate to the top right and using the dropdown next to ‘CONFIG ACTIONS’, select ‘Deploy Configuration’

- Status changes to committing. You will see a pop up momentarily that the commit was successful.

- The Rulestack and Firewall Rule creation is completed.
Deploy CloudNGFW and create endpoint
We will now deploy the cloudNGFW service on the security VPC. The security VPC along with the Application and attack VPCs were provisioned using terraform.
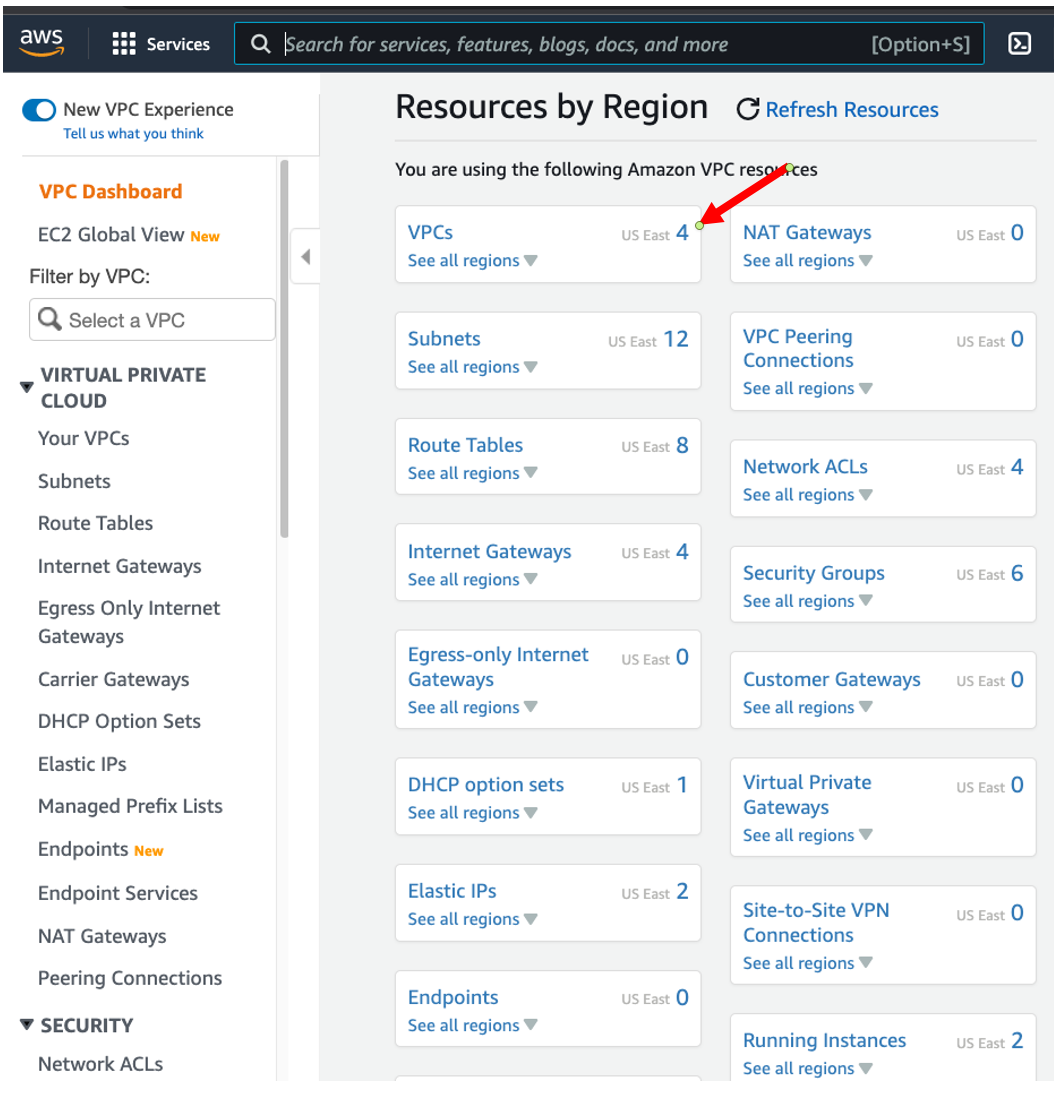
- Navigate to the AWS Console browser tab. Search for VPC and click on VPC.

- Review the services that are already provisioned. Click on the ‘4’ against VPC to list the 4 VPC created.
Note that the name of the security VPC is “qwikLABS-sec-vpc”. We will be deploying the CLoudNGFW endpoint here.

- Navigate back to the Cloud NGFW browser tab and from the left vertical menu select ‘NGFWs’

- On the top right, click on ‘Create Firewall’

- In the General section of the Create Firewall form,
- Name your CloudNGFW instance ‘MyfirstCloudNGFW’
- Select your AWS account
- Set VPC to ‘qwikLABS-sec-vpc’

- In the Rulestack section of the Create Firewall form,
- Set Rulestack to ‘Rulestack1’ from dropdown
- Say yes to create endpoint
- Select qwikLABS-sec-vpc-subnet
- Click ‘Save’


- You have initiated deployment of CloudNGFW in the Qwiklab environment. The deployment will take around 10-15 mins to complete successfully.
Activity 3: Secure
In this session we will be creating firewall policies and experience how the best practice default profiles give you protection against threats like Log4J.
Overview
- Configure Logging
- Route traffic from the Application and Attack VPCs to the Firewall through the Endpoint created in the Security VPC.
- Check connectivity between the Application and the Attack servers.
- Launch the attack from the Attack server to the Application
- Monitor the attack via Logs
- Set Recommended Profile
- Re-launch attack
- Monitor the attack via Logs
Note: Before you begin this activity, review the CloudNFGW deployment status. The status of the deployment should be CREATE_COMPLETE.

Figure: Cloud NGFW Deployment Status
Configure Logging
- Navigate to the AWS console browser tab. In the Search bar at the top, type “cloudwatch” and from the search results, click on ‘CloudWatch’.

- On the left menu, expand ‘Logs’ and click on ‘Log groups’.
- Navigate to right top corner and click on ‘Create log group’

- Set the log group name to ‘PaloAltoCloudNGFW’. Note the name should match exactly in case. Click on ‘Create’.


- Navigate back to the CloudNGFW console.
- Click on NGFWs and ‘myfirstCloudNGFW’

- Navigate to the ‘Log Settings’ tab. In the Log Type section,
- Select checkboxes against TRAFFIC and THREAT.
- Select the Log Destination Type as Cloudwatch Log Group and type in ‘PaloAltoCloudNGFW’ as Log Destination. Note that this is the CloudWatch Log Group that you just created.

- Navigate to the ‘Threat’ tab and do the same. Click save.

Route Traffic to Firewall
- Navigate to the AWS Console browser tab.
- In the Search bar at the top of the page, type “vpc” and click on VPC from the search results.
- In the left menu on the VPC console, click on Transit gateway route tables.
- From the list of Transit gateway route tables, identify the route table with the name “qwikLABS-from-app-vpcs” and click on the Transit gateway route table ID corresponding to it.

- Navigate to the Routes tab, from the route table, select the static routes to the app servers and delete them one by one. Basically, we are deleting the direct static routes that allow East-West traffic between the app servers . This is because we want to route the East-West traffic between the app servers via the Cloud NGFW.

- Once that’s done, again in the left menu on the VPC console, click on Route Tables.

- From the list of Route Tables, identify the route table with the name “qwikLABS-sec-vpc-tgw-rt” and click on the Route Table ID corresponding to it.
- In the Routes section of the selected Route Table, click on Edit Routes.

- On the Edit Routes page,
- add a route with destination 0.0.0.0/0.
- In the Target field, select the GWLB (Gateway Load Balancer) Endpoint created by CloudNGFW.
- Save changes

Launch the Log4J Attack
- On the att-app-server command prompt, execute this command to launch the Log4J attack.
/tmp/launch_attack.sh
- This time, you will not see the ‘Hello, world” message as the attack will have been blocked by the NGFW.

Monitor threat log
- Navigate to the AWS Console browser tab, on the Search bar at the top of the page, type “cloudwatch” and select “CloudWatch” from the search results.
- From the left menu, click on “Log groups” and from the list of Log groups, select “PaloAltoCloudNGFW”.
- Navigate to AWS CloudWatch browser tab and click on ‘Log Groups’
- Click on the THREAT log file.

- Click on the arrow to open the log. You can see that CloudNGFW successfully detected and prevented the attempted Log4J attack.

Play around with Security Profiles
- On the CloudNGFW Console, navigate to Rulestacks and click on ‘Rulestack1’
- Navigate to the ‘Security Profiles’ tab.

By default, IPS Vulnerability, Anti-Spyware, Antivirus and File Blocking features are enabled in the Security Profiles. This is what blocks the Log4J attack in the previous step. Just for the purpose of this activity, we can disable some of these profiles.
- Disable IPS Vulnerability, Anti-Spyware, Antivirus and File Blocking.

- From the ‘CONFIG ACTIONS’ dropdown list at the top-right side of the page, select ‘Deploy Configuration’.
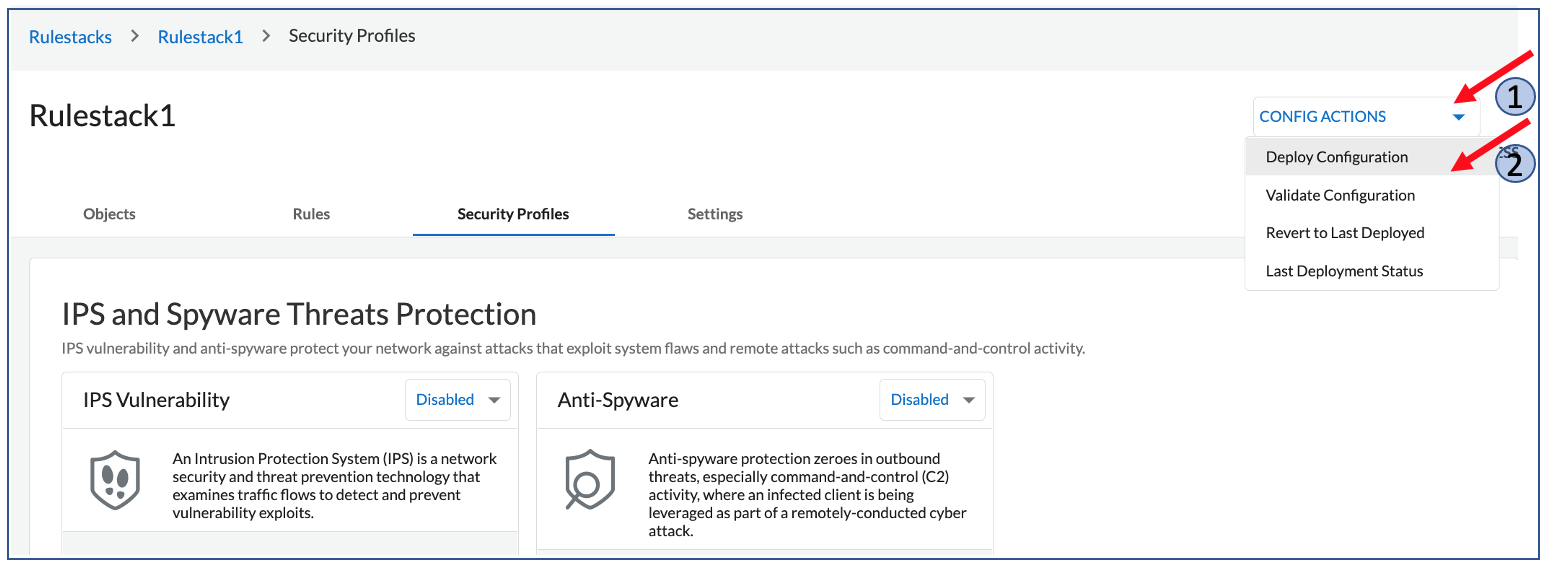
- Commit status will change to ‘Pending’ and then ‘Success’

Relaunch Attack
- Navigate to att-app-server SSH session and launch the attack again.
/tmp/launch_attack.sh
- You will get a “Hello, world!” message as a response indicating that the attack is successful.

- Switch context to the vul-app-server SSH session and use the following commands to connect to the vul-app-1 container and view the /tmp directory. You will see that the vul-app server has been infected with malware.
sudo docker exec -it vul-app-1 /bin/sh
ls -alrt /tmp
- Verify the attack by checking the logs on CloudWatch. Navigate to the AWS Console browser tab, on the Search bar at the top of the page, type “cloudwatch” and select “CloudWatch” from the search results.
- From the left menu, click on “Log groups” and from the list of Log groups, select “PaloAltoCloudNGFW”.

- Open the TRAFFIC log file and you would see the sequence of a successful Log4J attack. Sessions on port 8080, 1389 and 8888.


Enable Best Practice Security profiles
To secure the East-West traffic once again, you can update the Security Profiles on the Rulestack back to Best Practice and relaunch the attack. This time the attack will be blocked by CloudNGFW.
Congratulations!!!
Congratulations, you have successfully completed this Hands ON lab. As part of this lab you went through the process to SUBSCRIBE to Palo Alto CloudNGFW Service on AWS. You familiarize yourself with ways to DEPLOY the service to protect your application on AWS. And finally, you learned how to SECURE your environment with ‘Best Practices’ security profiles from Palo Alto Networks.
Lab Teardown
Unsubscribe from CloudNGFW Service
- Navigate to the AWS Marketplace console. You can search for ‘market’ and click on ‘AWS Marketplace Subscriptions’.
- Click on ‘Cloud NGFW PAY-as…” service

- Click on ‘Action’ at the bottom of the page and click on ‘Cancel Subscription’

- Select the checkbox to acknowledge and click on ‘Yes, cancel subscription’


- You have successfully unsubscribed from the CloudNGFW service.
Resources and Reference
Here are links to some of the resources for CloudNGFW service.
- eBook: Cloud NGFW - Palo Alto Networks
- Cloud NGFW: Solution Brief - Palo Alto Networks
- Cloud NGFW for AWS Datasheet - Palo Alto Networks
- AWS Marketplace: Palo Alto Networks Cloud NGFW (Next-Generation Firewall) Pay-As-You-Go!
- Getting Started with Cloud NGFW for AWS
Troubleshooting
Issues with the Lab Setup
In case you run into any errors during the execution of the setup script the deployment is a failure, you can follow the below steps;
- Run the setup script again. This should take care of any temporary issues like timeouts, etc.
- If you still see an error, reach out to your Lab Administrator for further steps.
- You can also open the setup.sh script in an editor and attempt all the steps one by one in the same order as in the script from a separate terminal.
Docker related Issues
If the docker list command errors out or does not show the containers, use the following commands to start containers manually.
- Try restarting the instance
- If the att-svr container is not coming up, use this command to start it manually. At the command prompt, execute this command:
sudo docker container run -itd --rm --name att-svr -p 8888:8888 -p 1389:1389 us.gcr.io/panw-gcp-team-testing/qwiklab/pcc-log4shell/l4s-demo-svr:1.0
- If the vul-app-1 container is not up, use this command to start it. At the command, prompt execute this command:
sudo docker container run -itd --rm --name vul-app-1 -p 8080:8080 us.gcr.io/panw-gcp-team-testing/qwiklab/pcc-log4shell/l4s-demo-app:1.0